This section details the hardware setup utilized in our project. It covers the selected components, their specifications, interconnections, and the rationale behind each design choice to ensure optimal performance and compatibility.
Due to current German aviation regulations, our drone must not exceed a total weight of 250 grams. This threshold allows operation without formal registration or special permits, significantly simplifying compliance while still enabling a fully functional and capable system within strict weight constraints.
Hardware Components
-
Frame:
Volador II VX5 FPV Freestyle T700 Frame Kit-Black- The frame serves as the structural foundation of the drone, providing mounting points for all essential components such as motors, flight controller, battery, and sensors. It must be both lightweight and durable to meet the strict 250 g weight limit while ensuring mechanical stability during flight.
- In our case, we use a 5-inch (5 Zoll) frame with a total weight of 177.4 g, which offers a good balance between size, stability, and compatibility with standard components. The frame costs around 77€, making it a solid mid-range option in terms of both performance and price.
-
Propellers:
Hurricane 51477-3 Clear Blue PC 2L2R- The propellers are a critical component for generating lift and ensuring stable flight dynamics. We use 5-inch (5 Zoll) tri-blade propellers, which offer a good compromise between thrust, efficiency, and responsiveness.
- In our case, each propeller weighs 4.1g, contributing minimally to the overall weight budget, and costs only 3€, making it a lightweight and economical component.
-
Propeller motors:
4x XING E-Pro 2306 2450kv- Propeller motors are responsible for driving the propellers and generating the thrust required for lift and maneuvering.
- Each motor weighs 33.6g, resulting in a total motor weight of 134.4g, and is priced at approximately 22€, offering a reasonable balance between performance and cost.
-
Flight controller:
SPEEDYBEE F4-40A-AIO- We use the SPEEDYBEE F4-40A AIO (All-In-One) flight controller to manage all aspects of the drone’s flight. It integrates the flight control unit and a 40A electronic speed controller (ESC) into a single board, reducing weight and simplifying wiring.
- The board weighs only 13.6g, making it a highly efficient choice for lightweight drones, and is priced at approximately 70€, reflecting its advanced functionality and compact design.
-
Video transmitter:
SpeedyBee TX800 FPV VTX- We use the transmitter to send the live video feed from the drone’s camera to the pilot’s goggles.
- The used transmitter has a weight of only 5.6 g, making it an ideal fit for our weight requirements, and is priced at approximately 44€, offering a good balance between size, weight, and functionality.
-
Camera:
Caddx Ratel PRO MN01 - 4000BRaspberry Pi Camera: RB-Camera_JT-V2-120- We use these two cameras in our project. The first camera is dedicated to capturing and transmitting live video feed to the pilot’s goggles, while the second camera is used exclusively for the AI application running on the Raspberry Pi.
- The Caddx Ratel PRO MN01 – 4000B weighs approximately 9.5g and is priced at around 55€, while the Raspberry Pi Camera RB-Camera_JT-V2-120 weighs about 4g and costs approximately 20€, making both suitable options depending on the desired trade-off between image quality, weight, and budget.
-
GPS modul:
HGLRC M100-5883- We have integrated a GPS module into the system, intended to support the AI application. This enables autonomous flight capabilities, allowing the drone to navigate from point A to point B without manual control.
- The GPS module weighs 7.7g and is priced at approximately 20€, offering a compact and cost-effective solution for reliable positioning and navigation.
-
Single board computer:
Raspberry Pi Zero 2 W- The single board computer is used as the computing platform for our AI application. Details about its role and the software implementation will be explained further in the software section of this documentation.
- The single board computer has a weight of 10g and costs around 20€.
-
AI accelerator:
Coral Google Edge TPU USB accelerator- To accelerate the AI application, we use the Coral Google Edge TPU machine learning accelerator, which significantly boosts inference speed and efficiency.
- The accelerator weighs approximately 90g and costs around 60€, providing a powerful yet portable solution for edge AI processing tasks.
-
Storage:
Samsung microSDHC EVO+ MB-MC32GA/EU- The SD card has 32GB of storage available and costs around 10 - 20€, depending where you buy it.
-
Batteries:
- heavy:
R-LINE Tattu 95C - 750mAh - light:
Gaoneng LiPo Akku 4S 650mAh 15.2V- Both batteries can be used interchangeably to power either the drone or the controller.
- The R-LINE Tattu 95C 750mAh battery has a net weight of approximately 82g (±10) and costs around 21€, while the Gaoneng LiPo Akku 4S 650mAh 15.2V battery weighs around 70g (±3) and costs approximately 19€.
- heavy:
-
Remote controller:
Radiomaster Boxer ELRS GRYM2- The Radiomaster Boxer ELRS GRYM2 is used to control the drone during flight. It sends commands to the flight controller via the ExpressLRS protocol, enabling precise and reliable manual operation.
-
Goggles:
FATSHARK ECHO FPV Video Headset - Part Number: FSV1131-04- We use the Fatshark Echo goggles to receive the live video feed transmitted from the drone’s onboard camera.
-
Charger:
SKYRC S100 neo AC/DC Smart Balance Charger- The charger is used to power all the necessary batteries for our setup, or example, those used in the drone itself as well as the controller.
-
Smoke Stopper:
TBS Smoke Stopper- To protect our electronic components during initial power-up and testing, we used the TBS Smoke Stopper. This device acts as an in-line fuse and current limiter, helping to prevent damage caused by short circuits or wiring mistakes.
This results in a current total drone weight of approximately 608,9g. The overall cost of the components is at around 431€.
Drone Construction Overview
-
Propeller Motors:
-
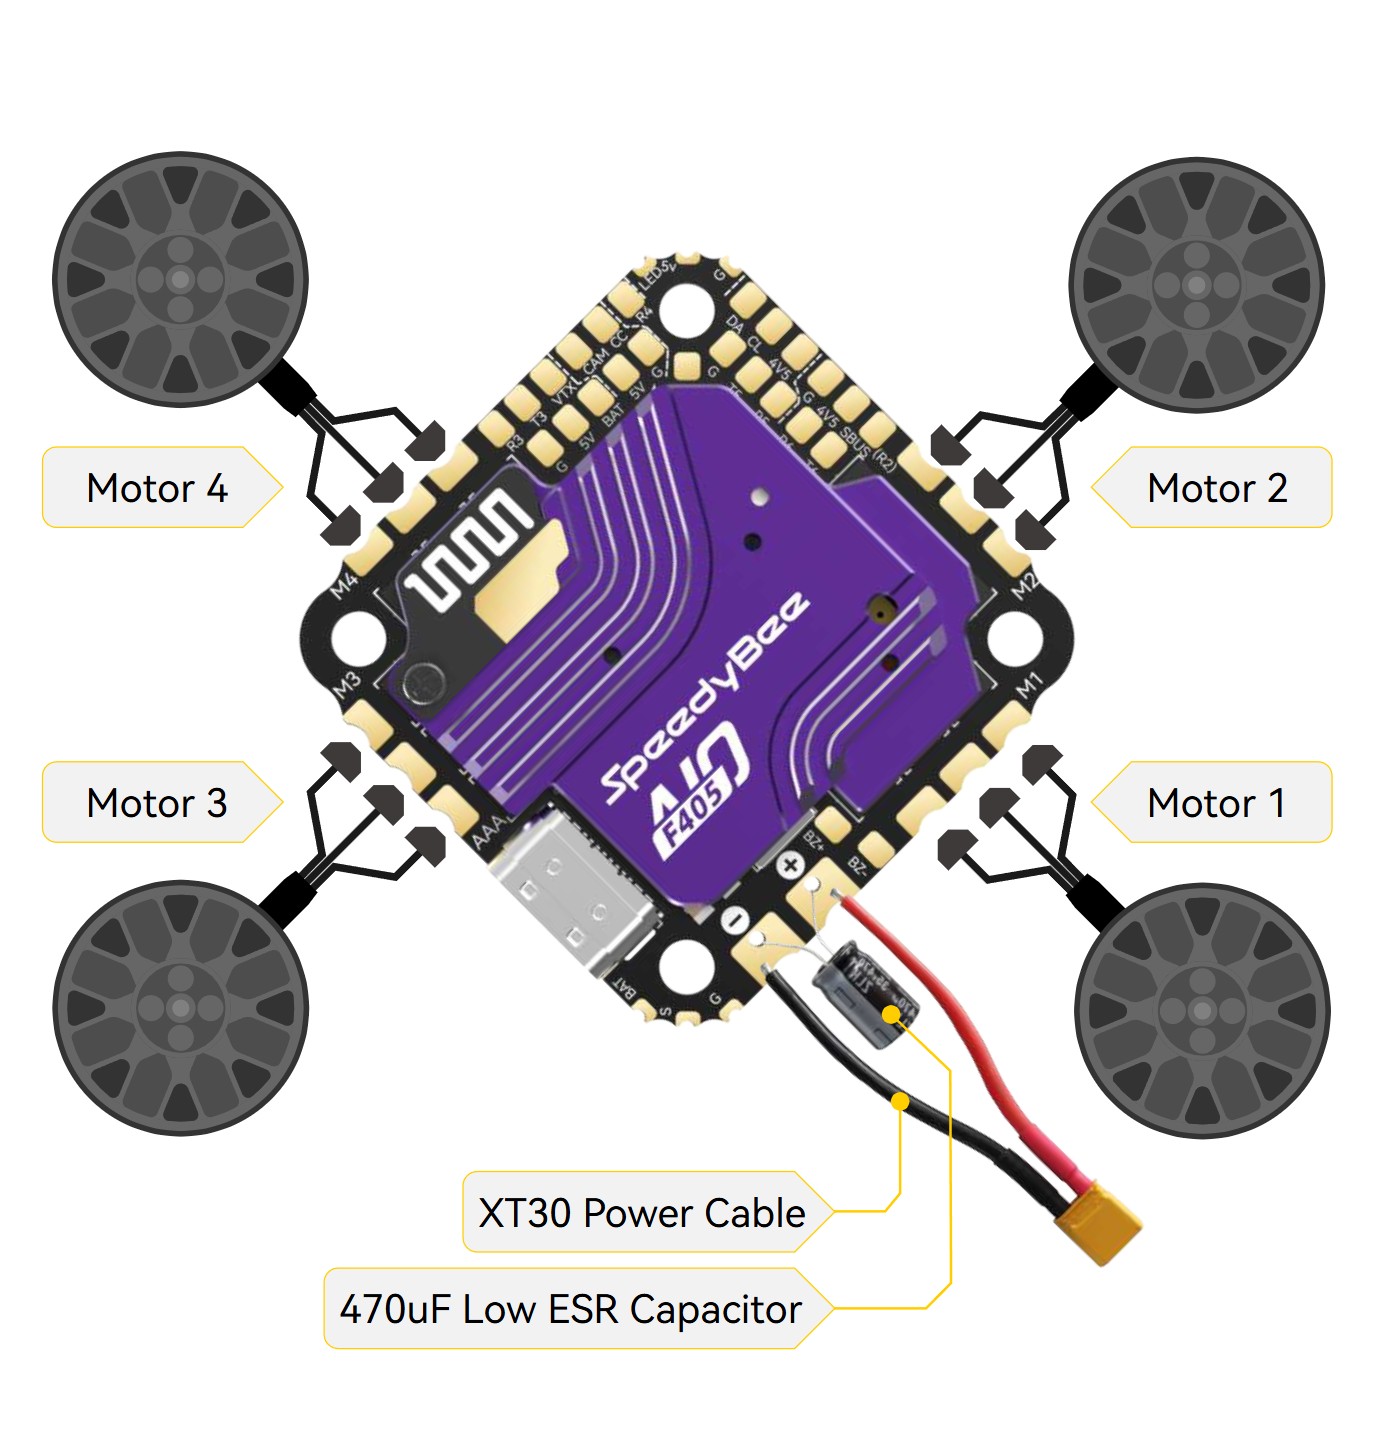
To connect the propeller motors to the flight controller, the propeller motors wires were soldered directly to the flight controller. The has specific solder pads for this purpose, making it easy to attach the motor wires directly to the board. The motor mapping - defining which motor corresponds to which output - an be configured either in Betaflight or conveniently through the SpeedyBee app on a smartphone. In addition to the motors, it was also necessary to solder a power cable and a capacitor to the flight controller. Both components share the same solder pads, so they had to be carefully connected to ensure proper power delivery.
-
-
-
Video Transmitter:
-
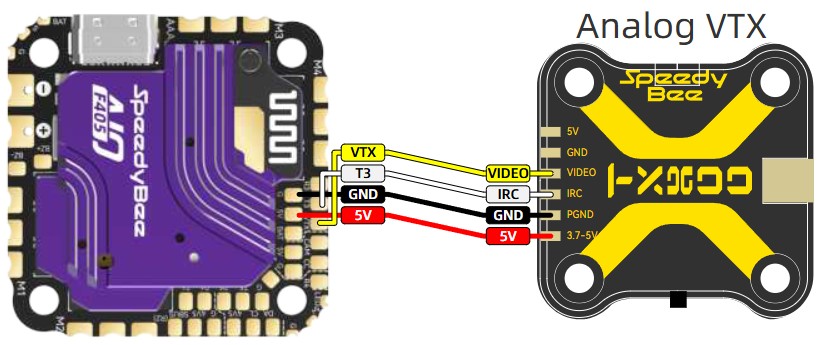
To connect the video transmitter to the flight controller, four cables were used: black, red, white, and yellow.
- The black cable connects the GND pad on the video transmitter to a GND pad on the flight controller, ensuring a common ground.
- The red cable supplies power by connecting the 5V output on the flight controller to the 5V input on the video transmitter. This means the flight controller also functions as a power supply for the VTX, eliminating the need for a separate power source.
- The white cable connects the IRC pad (for control commands) on the video transmitter to the T3 pad on the flight controller. This allows the flight controller to send configuration commands to the VTX, such as changing channels or power levels.
- The yellow cable connects the VTX pad on the flight controller to the video input pad on the video transmitter. This carries the video signal from the onboard camera, which is then transmitted to the FPV goggles.
-
-
-
Camera
Caddx Ratel PRO MN01 - 4000B:-
To connect the camera to the flight controller, we used an extension board that simplifies and improves the soldering process. The 5V pad from the flight controller is connected to the V_IN pad on the extension board, while the GND pad on the flight controller is connected to the GND pad on the extension board. This setup ensures a reliable power and ground connection between the two components. Afterwards, the GND and power cable are connected to the corresponding pads on the extension board, while the remaining signal cables are soldered directly to the flight controller.
-

-
-
ELRS Receiver:
-
To connect the ELRS receiver to the flight controller, the following cable connections are required:
- The black cable is soldered to the GND pads on both the receiver and the flight controller to establish a common ground.
- The red cable connects the VCC pad on the receiver to the 5V pad on the flight controller, supplying power to the receiver.
- The white cable is soldered from the TX pad on the receiver to the R6 pad on the flight controller, allowing data transmission from the receiver to the controller.
- The yellow cable connects the RX pad on the receiver to the T6 pad on the flight controller, enabling data transmission from the controller to the receiver.
-

-
-
GPS Modul:
-
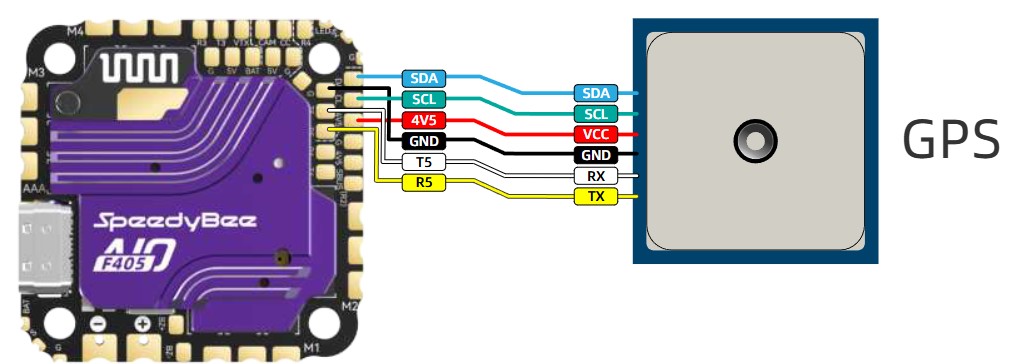
To connect the GPS module to the flight controller and ensure proper functionality, the following cable connections are required:
- The black cable is soldered to the GND pads on both the receiver and the flight controller to establish a common ground.
- The red cable connects the VCC pad on the receiver to the 5V pad on the flight controller, supplying power to the receiver.
- The yellow cable connects the TX pad on the GPS module to the R5 pad on the flight controller, allowing data to be sent from the GPS to the controller.
- The white cable connects the RX pad on the GPS module to the T5 pad on the flight controller, enabling the controller to send data back to the GPS module.
- The green cable connects the SCL pads on both devices, establishing the clock line for I2C communication.
- The blue cable connects the SDA pads on both devices, providing the data line for I2C communication.
-
-
-
Connection for the Raspberry Pi:
- To ensure proper power supply to the Raspberry Pi, two cables—one for ground (GND) and one for power—must be soldered to the flight controller. These connections can optionally be made using the extension board to simplify the soldering process. Additionally, it is possible to solder extra cables to enable GPIO communication between the Raspberry Pi and the flight controller. This GPIO traffic can include various types of data, such as telemetry, control signals, or sensor input. If soldering is not feasible—for example, due to space constraints or hardware limitations—Bluetooth Low Energy (BLE) or a direct USB connection can serve as alternative communication methods.
- On the Raspberry Pi side, the following GPIO pins are used:
- Pin 4 provides the power supply (5V),
- Pin 6 serves as GND,
- Pin 8 is the RX pin and should be connected to the TX pad on the flight controller,
- Pin 10 is the TX pin and should be connected to the RX pad on the flight controller.
This setup enables both power delivery and bidirectional communication between the Raspberry Pi and the flight controller.